

Table of contents
- Kubernetes
- Explain the architecture of Kubernetes
- What is Control Plane?
- Write the difference between kubectl and kubelets
- Explain the role of the API server
- Setting up a Kubernetes Cluster
- Deploying Applications on Kubernetes
- Scaling and Autoscaling in Kubernetes
- Service Discovery and Load Balancing in Kubernetes
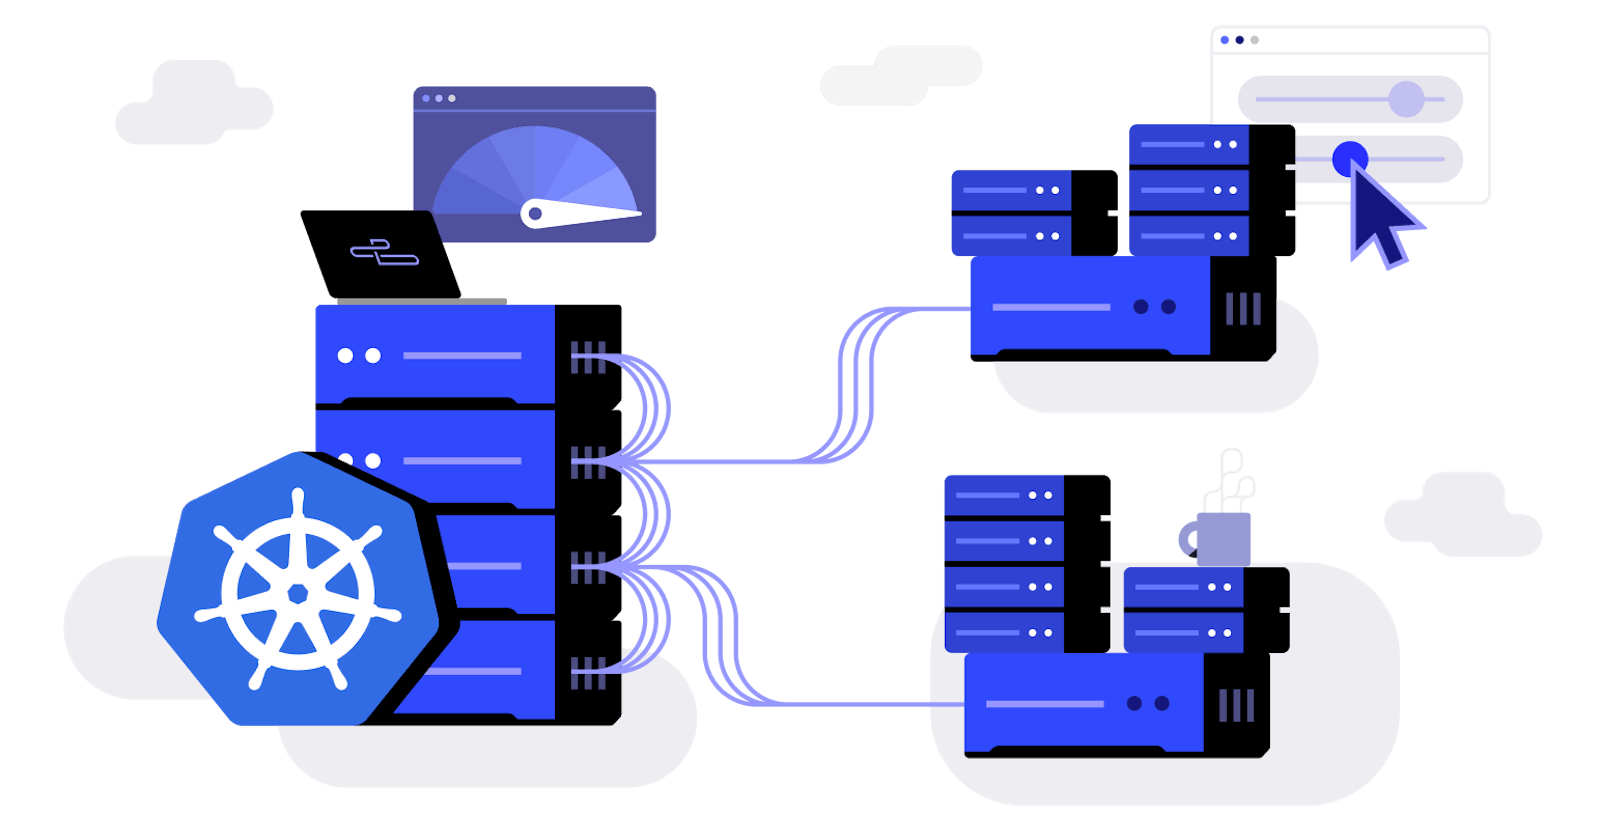
Kubernetes is an open-source platform that automates the deployment, scaling, and management of containerized applications. It provides a way to run applications in a highly available and fault-tolerant manner by orchestrating containers across a cluster of machines. Kubernetes abstracts away the complexity of managing individual containers and offers features like scaling, load balancing, and self-healing. It allows developers to focus on their applications while ensuring reliability and scalability.
Kubernetes

Imagine you have a team of dedicated workers in a factory, and you're the manager overseeing their operations. Kubernetes is like the master coordinator in that factory, making sure everything runs smoothly and efficiently.
Each worker represents a container, which holds a specific task or application. These workers are organized into groups called pods, where they work together and share resources like tools and equipment.
To ensure that the work is evenly distributed, Kubernetes assigns these pods to different machines known as nodes. Nodes can be thought of as the workstations or stations in the factory where the workers carry out their tasks.
As the manager, you use a deployment plan to define how many workers (replicas) are needed for each task. This plan guides Kubernetes to create and manage the right number of workers to meet the demand. If a worker fails or gets overwhelmed, Kubernetes automatically replaces or adds more workers to maintain the desired workforce.
To keep everything connected and accessible, Kubernetes sets up services. Services are like signposts that point to the workers and provide a consistent way to reach them. This helps distribute the workload and balance the tasks among the workers.
If you need to store materials or tools, Kubernetes provides volumes, which act like storage lockers. These volumes can be accessed by the workers and persist even if a worker is replaced or moved to a different workstation.
To ensure efficient communication and collaboration, Kubernetes divides the factory into different sections called namespaces. Each section represents a specific project or team, allowing them to work independently without interfering with each other's work.
Overall, Kubernetes acts as the manager of this factory, orchestrating the workers, allocating tasks, ensuring smooth operations, and making adjustments as needed. Just as the manager optimizes productivity and resource utilization
It is often called k8s. The abbreviation "K8s" is derived from the word "Kubernetes" by replacing the eight letters between the "K" and the "s" with the number "8." This shorter form is commonly used as a convenient and efficient way to refer to Kubernetes in written and verbal discussions within the tech community.
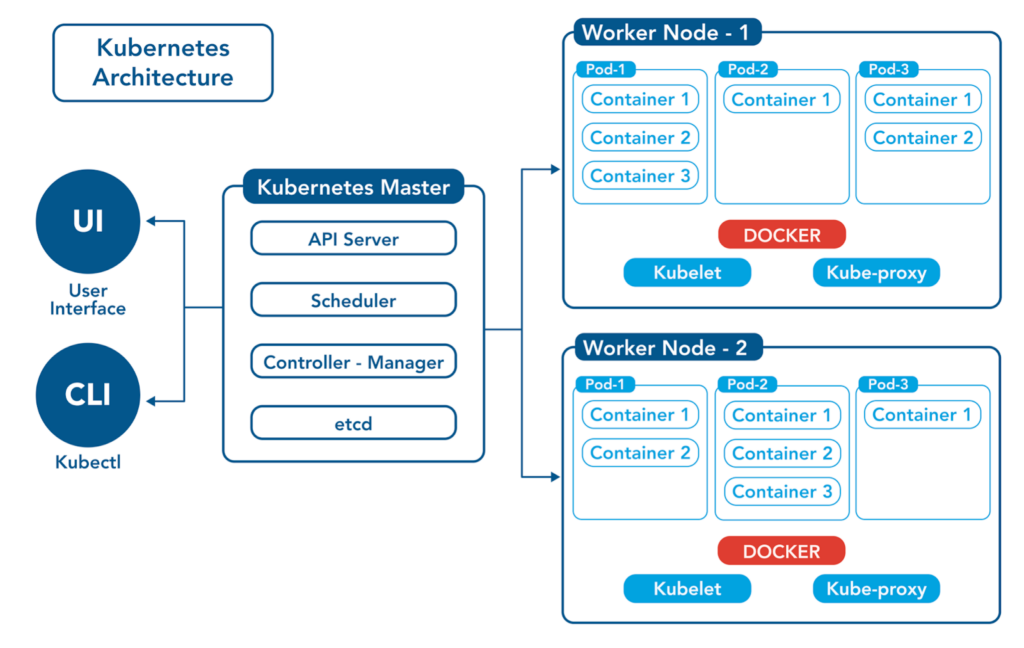
Explain the architecture of Kubernetes
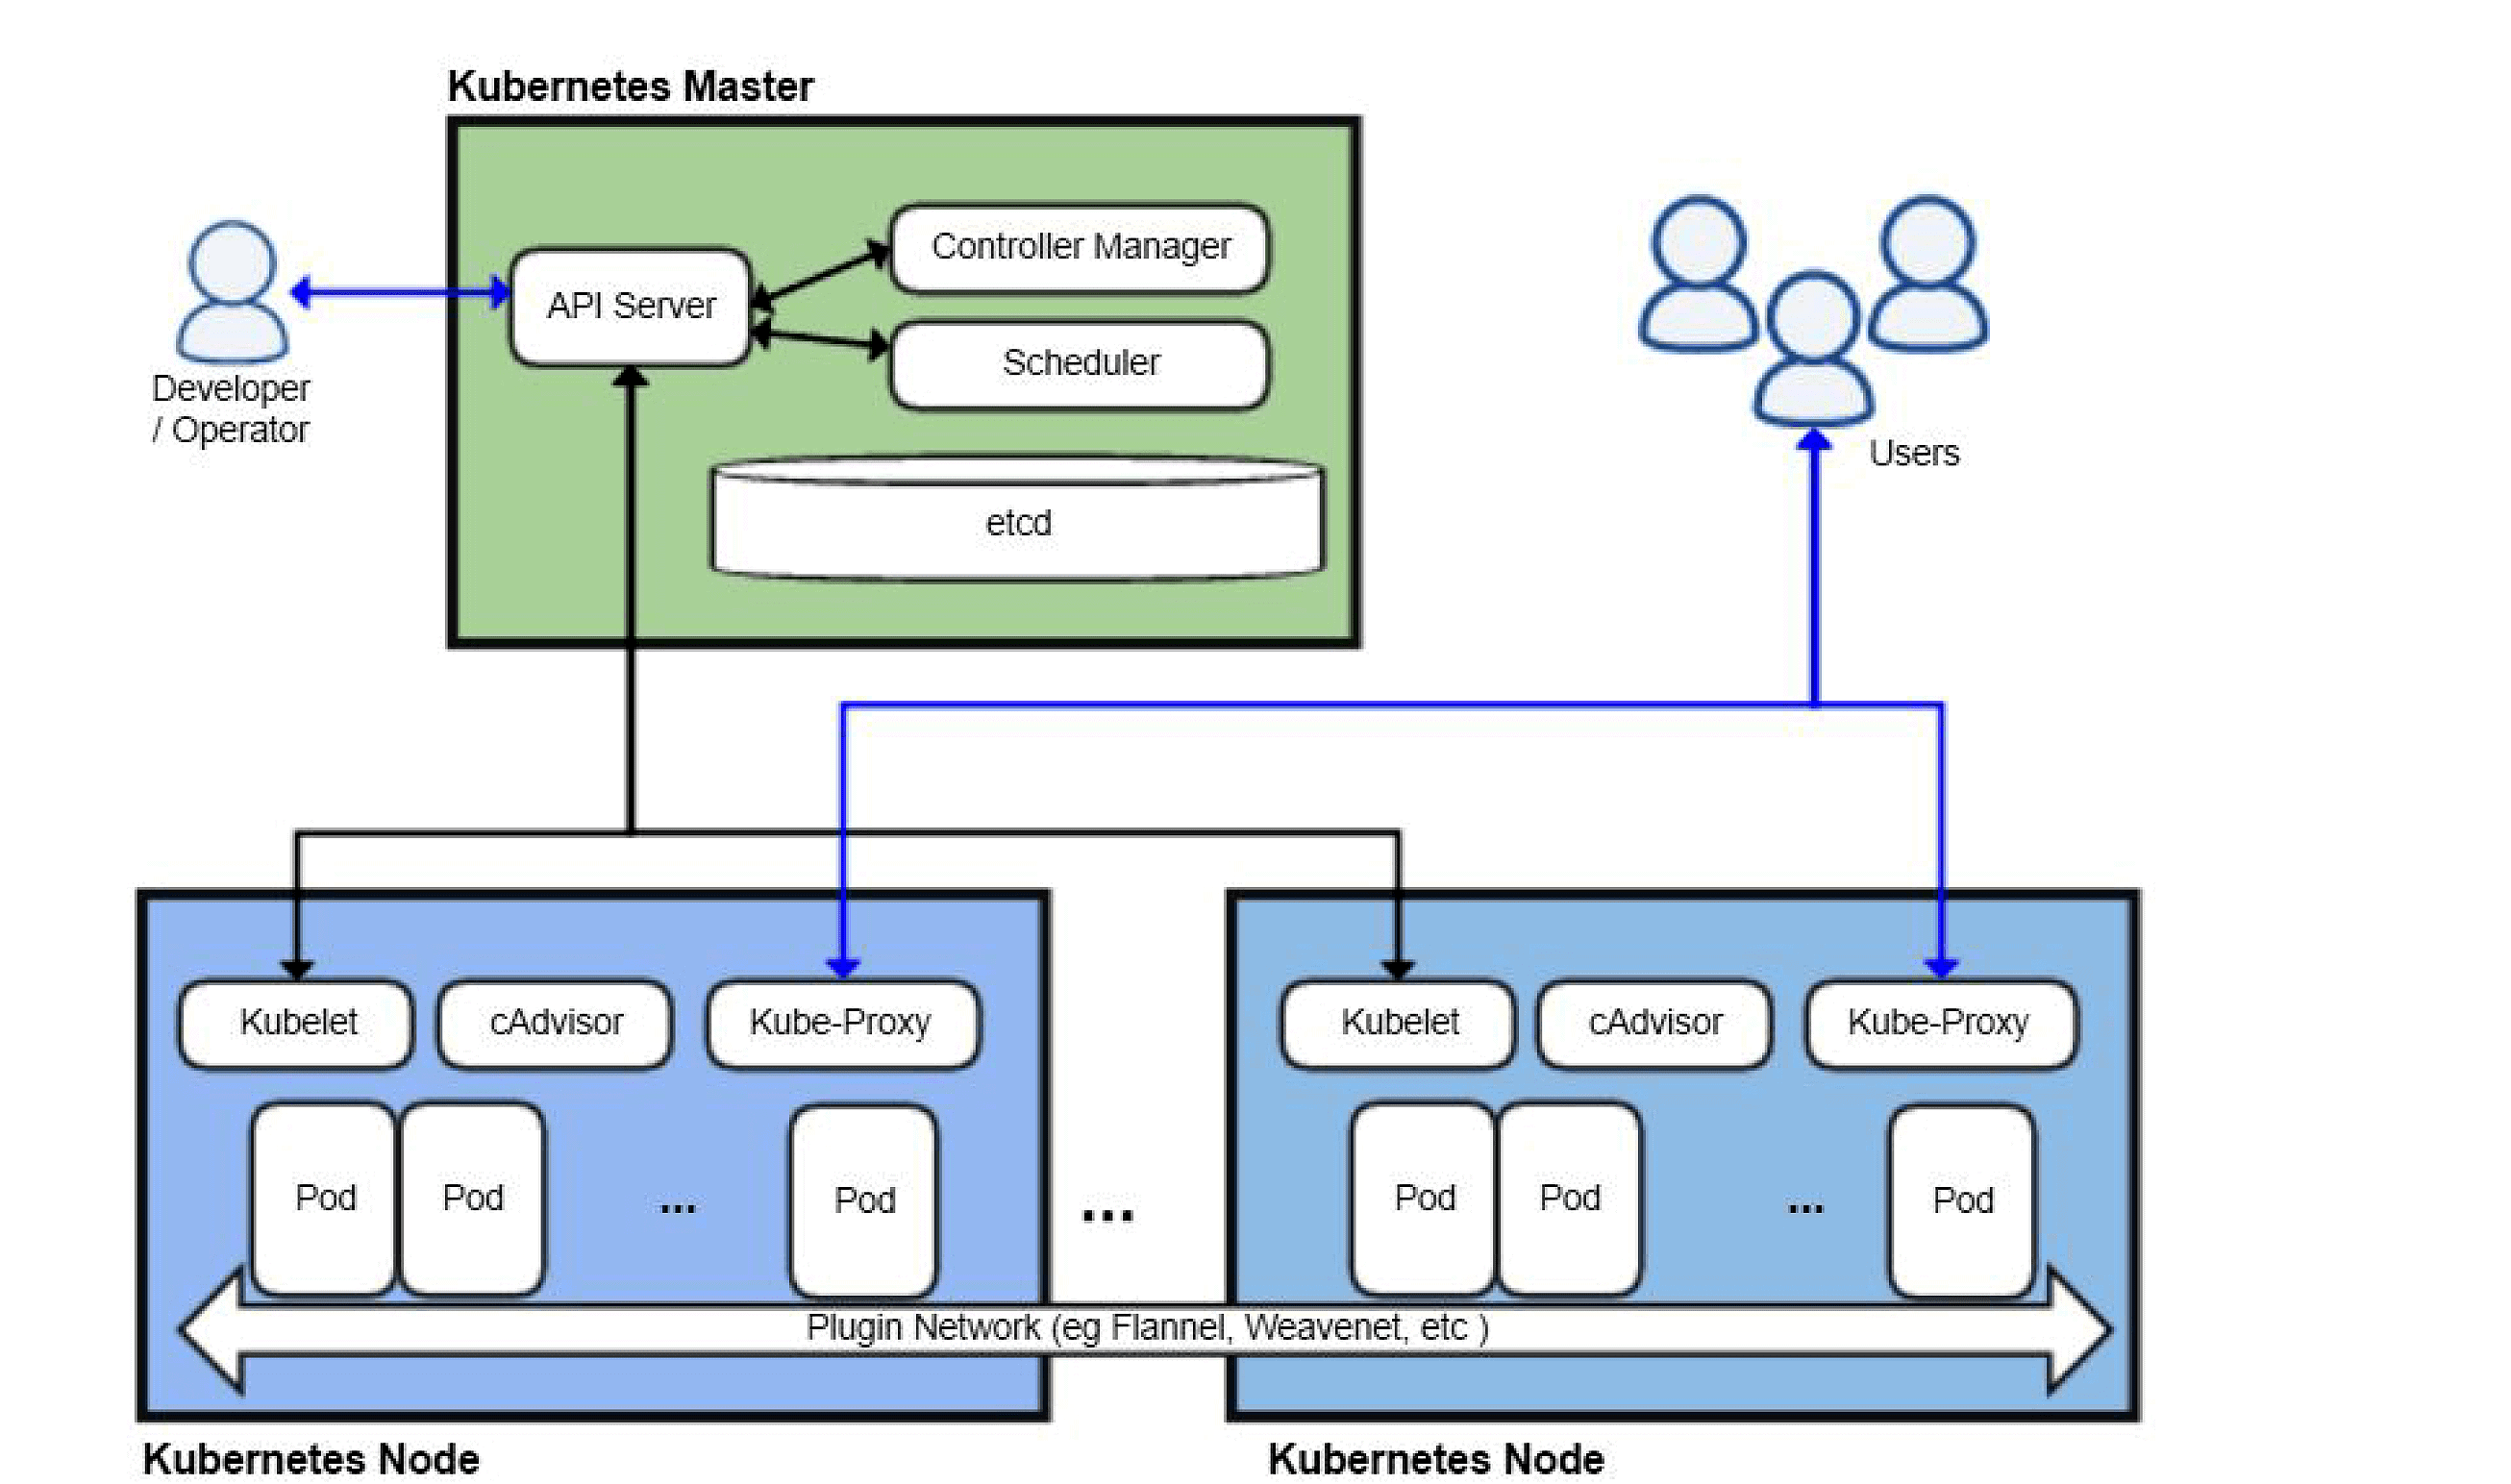
Kubernetes follows a master-worker architecture. The key components of Kubernetes architecture are:
Control Plane (Master): Manages and controls the cluster's overall state and manages the Worker Nodes.
Worker Nodes (Minions): Run the actual application workloads and are managed by the Control Plane.
The Control Plane consists of several components:
API Server: Exposes the Kubernetes API, receives and processes requests, and maintains the cluster's desired state.
etcd: A distributed key-value store that stores the cluster's configuration data and current state.
Scheduler: Assigns pods to Worker Nodes based on resource availability and placement policies.
Controller Manager: Manages various controllers that monitor and control the cluster's state, such as node controller or replica controller.
Cloud Controller Manager (optional): Integrates with the cloud provider's APIs to manage cloud-specific functionalities, like load balancers or storage.
Each Worker Node consists of:
Kubelet: The primary agent that runs on each node, responsible for managing and maintaining the node's resources and communicating with the Control Plane.
Container Runtime: Executes containers, such as Docker, on the node.
kube-proxy: Manages network connectivity and routing between pods and services.
What is Control Plane?

The Control Plane, also known as the Master, is the brain of the Kubernetes cluster. It manages and controls the cluster's overall state and orchestrates the various components and resources. The Control Plane includes components like the API server, etcd, scheduler, and controller manager. It receives and processes requests, maintains the desired state, and ensures the cluster operates according to the defined configurations and policies
Write the difference between kubectl and kubelets
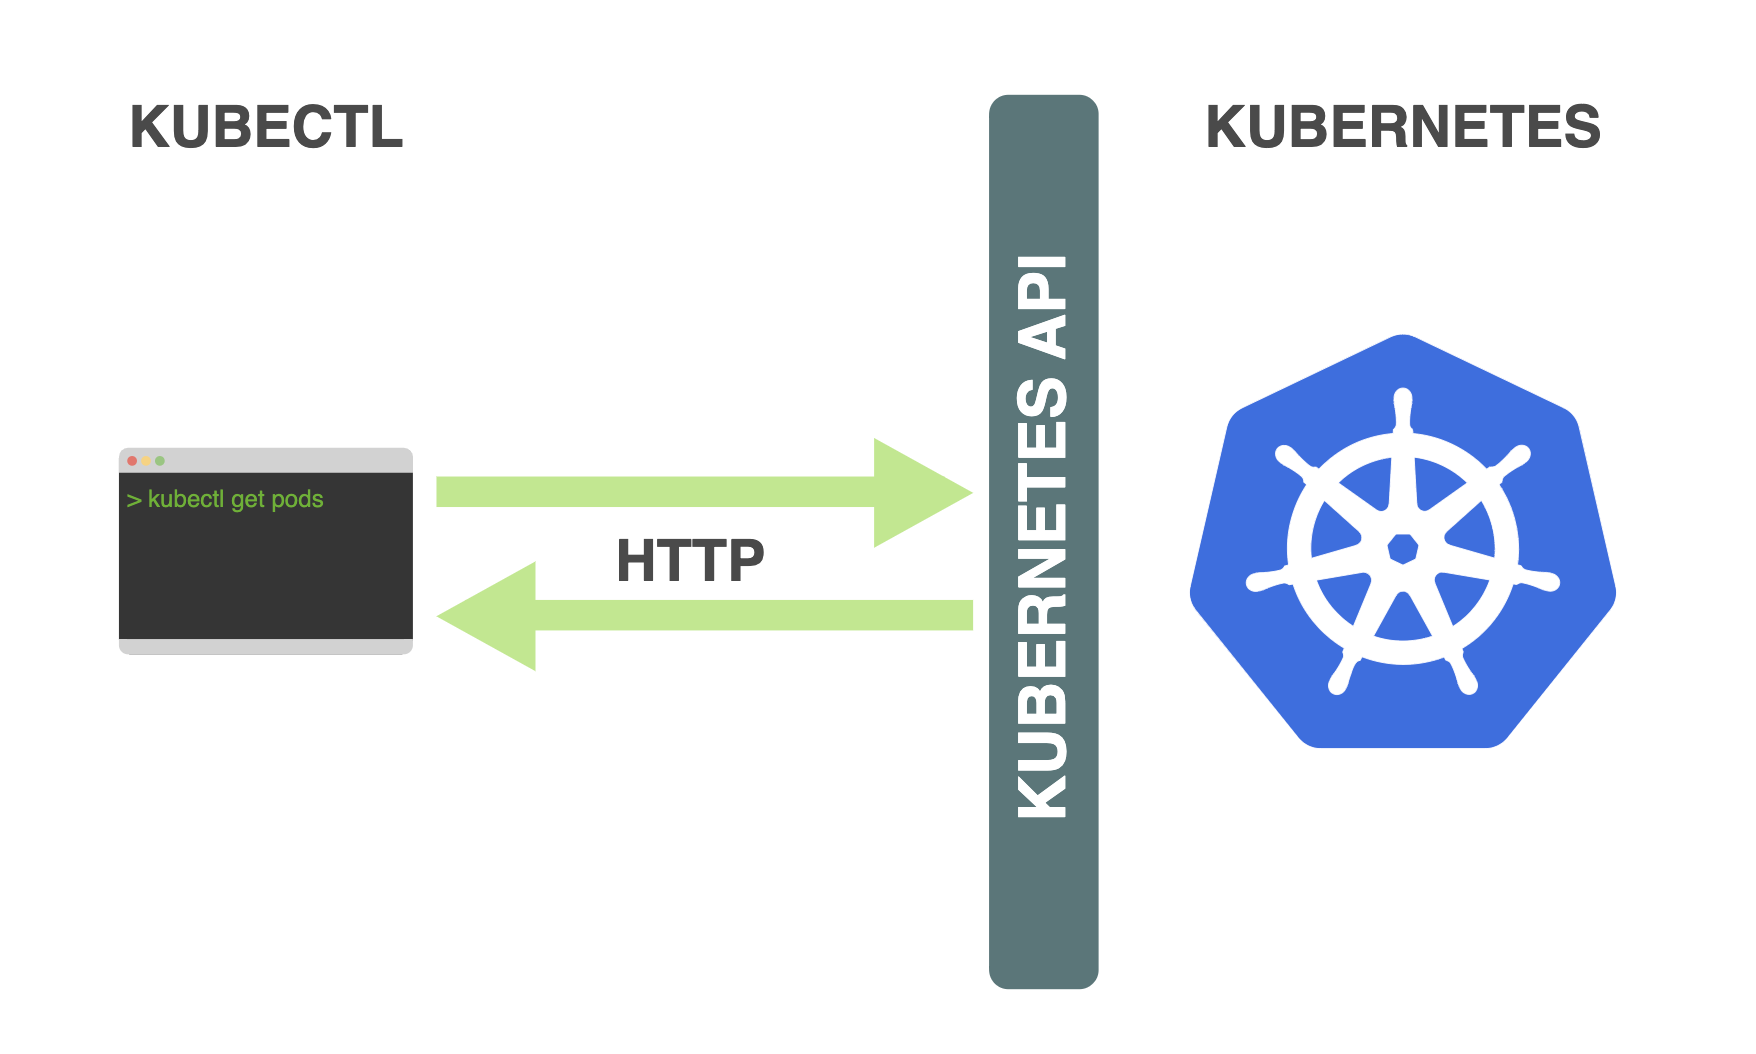
kubectl: kubectl is a command-line interface (CLI) tool used to interact with the Kubernetes cluster. It allows users to manage and control the cluster by executing commands to create, modify, and delete Kubernetes resources, such as pods, deployments, services, and more. It communicates with the API server to perform these operations and provides a convenient way to manage the cluster from the command line.
kubelet: kubelet is an agent that runs on each Worker Node in the Kubernetes cluster. It is responsible for maintaining the node's resources and ensuring that the pods assigned to the node are running and healthy. The kubelet communicates with the Control Plane and receives instructions on which pods to run and manage. It takes care of container lifecycle management, pod networking, and reporting the node's status back to the Control Plane.
Explain the role of the API server
In Kubernetes, an API server is like the brain of the system. It's responsible for receiving and processing requests from different sources, just like a customer service representative.
Think of it this way: When you want to do something with your Kubernetes cluster, like creating or managing an application, you talk to the API server. It's the one that understands your request and takes action accordingly.
For example, if you want to deploy a new application, you send a request to the API server with all the necessary details. The API server then checks if everything is okay and instructs the cluster on what needs to be done. It ensures that the application is set up properly and keeps an eye on its health and status.
In simple terms, the API server is like the go-to person you talk to when you need something done in your Kubernetes cluster. It understands your instructions, communicates with the cluster, and makes sure everything is working as expected.
Just like a customer service representative helps you get things done efficiently, the API server plays a similar role in Kubernetes by managing and coordinating actions within the cluster.
Setting up a Kubernetes Cluster
Setting up a Kubernetes cluster involves the process of preparing and configuring the necessary infrastructure to run Kubernetes. Here's a simplified overview:
Provision Infrastructure: Set up the required infrastructure, such as virtual machines or cloud instances, for your cluster nodes. This can be done manually or using infrastructure-as-code tools.
Install Kubernetes: Install Kubernetes on the cluster nodes. You can choose different installation methods like kubeadm, kubespray, or managed Kubernetes services provided by cloud providers.
Initialize Master Node: On one of the nodes, initialize the Kubernetes master using the appropriate command, such as
kubeadm init. This initializes the control plane components.Join Worker Nodes: Join the remaining nodes as worker nodes to the cluster using the join command provided during the initialization of the master node.
Set Up Networking: Configure networking for the cluster to enable communication between the nodes and pods. Options include Kubernetes networking plugins like Calico, Flannel, or Cilium.
Install Container Runtime: Install a container runtime like Docker or containerd on each node to manage the execution of containers.
Configure Cluster Access: Set up access credentials, such as certificates and authentication tokens, to securely interact with the cluster using the Kubernetes command-line tool (
kubectl).Verify Cluster: Use
kubectlcommands to verify the cluster's status, check node availability, and ensure all components are running properly.
Deploying Applications on Kubernetes
Deploying applications on Kubernetes involves the process of running and managing your applications within the Kubernetes cluster. Here's a simplified overview:
Containerize your application: Package your application and its dependencies into containers, typically using Docker.
Create Kubernetes Deployment: Define a Deployment configuration file specifying details like the container image, number of replicas, and resource requirements.
Apply Deployment: Use the
kubectl applycommand to apply the Deployment configuration and create the desired number of pods running your application.Expose Services: If your application needs to be accessed from outside the cluster, create a Kubernetes Service to expose it. Specify the port and target port for routing traffic to the pods.
Load Balancing: Kubernetes automatically load balances incoming traffic across the pods of your application, ensuring efficient distribution.
Scaling: Adjust the number of replicas in the Deployment configuration to scale your application up or down based on workload demands.
Rolling Updates: To update your application, modify the Deployment configuration with the desired changes, such as a new container image, and use
kubectl applyto trigger a rolling update process.Monitoring and Logging: Set up monitoring and logging solutions to track the health, performance, and behavior of your deployed applications.
Scaling and Autoscaling in Kubernetes
Scaling and Autoscaling in Kubernetes allow you to adjust the number of replicas or pods based on workload demands. Here's a simplified overview:
Scaling:
Scaling involves manually increasing or decreasing the number of replicas or pods for a deployment or statefulset.
Use the
kubectl scalecommand to scale up or down by specifying the desired replica count.Scaling helps accommodate changes in traffic or workload requirements, ensuring optimal performance.
Autoscaling:
Autoscaling automatically adjusts the number of replicas or pods based on resource utilization or custom metrics.
Horizontal Pod Autoscaler (HPA) is a Kubernetes feature that scales pods based on CPU utilization or custom metrics.
Vertical Pod Autoscaler (VPA) adjusts the resource limits of individual pods based on historical usage patterns.
Cluster Autoscaler scales the number of nodes in the cluster based on pending pod scheduling or resource constraints.
Configuring Autoscaling:
To configure autoscaling, define resource utilization targets or custom metrics thresholds.
Set minimum and maximum replica/pod limits to ensure autoscaling stays within defined boundaries.
Enable autoscaling using
kubectl autoscalecommand or declarative configuration using manifests.
Benefits of Autoscaling:
Autoscaling optimizes resource utilization, ensuring efficient allocation and cost savings.
It maintains application performance during traffic spikes or high workload periods.
Autoscaling improves availability by dynamically adjusting resources to meet demand.
Service Discovery and Load Balancing in Kubernetes
Service Discovery and Load Balancing in Kubernetes ensure efficient communication between applications and distribute traffic evenly. Kubernetes uses Service objects to abstract sets of pods and assign them unique IP addresses and DNS names. Service discovery enables applications to dynamically discover and communicate with other services by referring to their DNS names. Load balancing is automatically handled by Kubernetes, distributing incoming traffic across the pods behind a service using a round-robin algorithm. Different service types, such as ClusterIP, NodePort, LoadBalancer, and ExternalName, allow for various levels of internal and external accessibility. Ingress provides advanced routing and traffic management features. These mechanisms contribute to high availability, scalability, and streamlined connectivity within a Kubernetes cluster.
Configuring and Managing Storage in Kubernetes
Configuring and managing storage in Kubernetes involves using Persistent Volumes (PVs) to represent physical storage resources. Storage Classes define different storage types and provisioners. Applications request storage using Persistent Volume Claims (PVCs), which are matched to available PVs based on Storage Classes. Dynamic provisioning automates PV creation when PVCs are requested. These mechanisms ensure persistent storage availability for applications running in the Kubernetes cluster.
Updating and Rolling Back Deployments in Kubernetes
Updating and rolling back deployments in Kubernetes allows for making changes to your application and reverting to previous versions if needed.
To update a deployment:
Make the desired changes to the deployment configuration.
Use the
kubectl applycommand to apply the changes.Kubernetes performs a smooth update by gradually replacing old instances with new ones.
To roll back a deployment:
Use the
kubectl rollout historycommand to see the deployment's revision history.Identify the revision you want to roll back to.
Use the
kubectl rollout undocommand with the desired revision to initiate the rollback process.Kubernetes gradually replaces the new instances with the previous ones.
Throughout the process, you can monitor the status using commands like kubectl rollout status and ensure the correct number of pods are running.
Kubernetes also offers advanced strategies for controlled updates, such as canary deployments or blue-green deployments, for more fine-tuned rollout management.
Monitoring and Logging in Kubernetes
Monitoring and logging in Kubernetes are important for keeping track of the health, performance, and behaviour of applications running in the cluster.
Monitoring involves collecting metrics from different sources in the cluster, such as nodes and pods, using tools like Prometheus. This helps in identifying anomalies, tracking resource usage, and ensuring the overall well-being of the cluster.
Logging focuses on capturing logs generated by applications and cluster components. Tools like Elasticsearch and Kibana help centralize and analyze these logs, making troubleshooting and debugging easier.
Monitoring and logging solutions, such as Prometheus, Grafana, and ELK/EFK stacks, provide ready-to-use integrations, dashboards, and analytics for effective monitoring and log analysis.
Security and Access Control in Kubernetes
Security and access control in Kubernetes are vital for protecting your cluster and ensuring authorized access. Here's a simplified overview:
Authentication: Verify the identity of users and applications before granting access to the cluster.
Authorization: Define access policies based on roles and permissions to control what actions and resources users can access.
Network Policies: Set rules for secure communication and control access between pods or namespaces based on IP addresses and ports.
Secrets Management: Safely store and manage sensitive information like passwords and API keys using encrypted secrets.
Container Security: Use trusted container images, regularly update them, and employ security measures like image scanning and runtime security.
Audit Logging: Enable logging to record cluster activities, helping detect security breaches and track user actions.
Security Best Practices: Follow best practices like limiting privileged containers, setting resource limits, and keeping Kubernetes components up to date.
Troubleshooting and Debugging in Kubernetes
Troubleshooting and debugging in Kubernetes involves identifying and resolving issues in the cluster. Here's a simplified overview:
Check Logs: Examine logs from pods and cluster components using commands like
kubectl logsto find error messages and diagnose problems.Monitor Events: Keep an eye on Kubernetes events using
kubectl get eventsto track cluster and application activities.Verify Pod Status: Use
kubectl get podsto check the status of pods and identify any failed or error states.Resource Constraints: Ensure that resource limits like CPU and memory are appropriately set for pods.
Service Discovery and Networking: Verify that services and DNS are configured correctly for smooth communication between applications.
Check Configuration: Review configuration files for errors or inconsistencies, such as Deployment or ConfigMap settings.
Verify Kubernetes Components: Check the status of Kubernetes components like the API server, controller manager, and scheduler.
Use Debugging Tools: Take advantage of tools like
kubectl execto run commands inside containers and investigate issues interactively.
Happy Learning :)